teamcity, dotnet, build comments edit

I’ve run across more than my fair share of times, particularly early on in a project, where I need to flush the NuGet package cache for my TeamCity build agents. This has usually involved connecting to each agent in Remote Desktop and doing some manual commands or delete operations.

No more!

Instead of manually flushing the NuGet package cache, create a build configuration that does it for you.

Create a build configuration that isn’t attached to any source. The point of this build is to execute a script as the build user so the appropriate package cache gets cleared.

In the build configuration, add a single “Command Line” build step. Set the working directory to %teamcity.tool.NuGet.CommandLine.DEFAULT%\tools - this is where TeamCity has its default NuGet command line installation. For the custom script, put this:

echo ##teamcity[buildNumber '%build.counter% (%teamcity.agent.name%)']
nuget.exe locals -clear all

The first line sets the build number so you can see which agent ran it easily from the top-level dashboard. The build number will look like #24 (my-agent-name) The second line runs the actual NuGet package cache clearing command to ensure all the various cache locations get purged.

Now all you need to do is queue a build and target the agent you want to flush - it runs in a second or two and you’re done. No more need to connect and do it all manually.

halloween, costumes comments edit

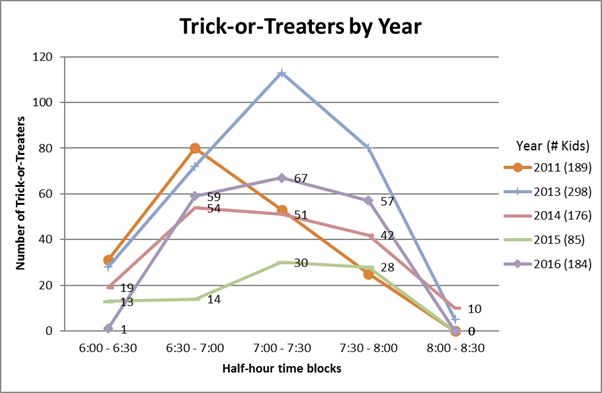
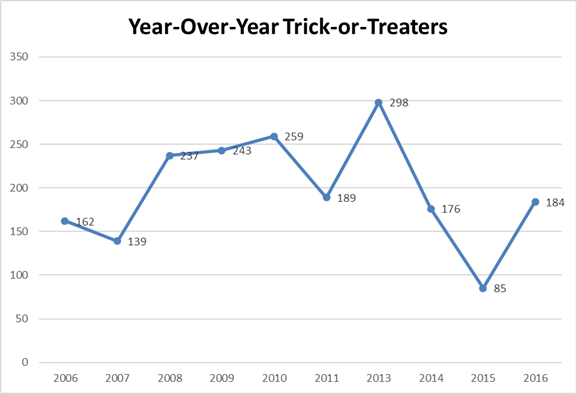
This year we had 184 trick-or-treaters. It’s a huge improvement over last year, but not one of the larger years.

2016: 184
trick-or-treaters.

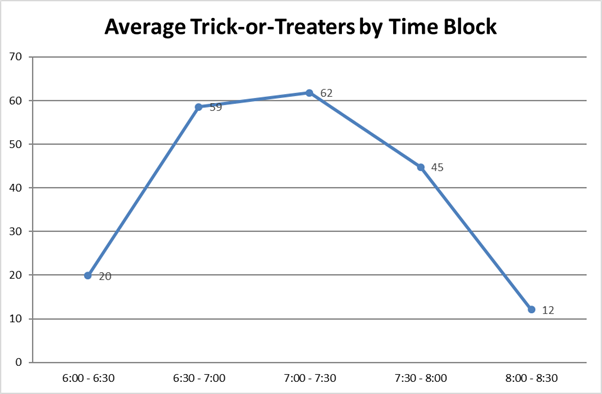
Average Trick-or-Treaters by Time Block

Year-Over-Year Trick-or-Treaters

Halloween was on a Monday and, while it had rained earlier, was pretty clear otherwise.

This year they started doing a “Harvest on Main Street” event in my city which had an unknown impact on the trick-or-treat count. I know some friends who went to this instead of going door-to-door. It looked fun, so if they do it next year we may have to check it out. An indirect impact of this, of course, is that it means fewer people available to hand out candy, which could cause fewer kids to travel down certain streets.

We shut down at 8:00p to get Phoenix into bed (since that’s bedtime). I foresee this being the case for a few more years. The 8:00p - 8:30p range has always been where things taper off anyway, so it’s not a major impact.

Cumulative data:

  Time Block
Year 6:00p - 6:30p 6:30p - 7:00p 7:00p - 7:30p 7:30p - 8:00p 8:00p - 8:30p Total
2006 52 59 35 16 0 162
2007 5 45 39 25 21 139
2008 14 71 82 45 25 237
2009 17 51 72 82 21 243
2010 19 77 76 48 39 259
2011 31 80 53 25 0 189
2013 28 72 113 80 5 298
2014 19 54 51 42 10 176
2015 13 14 30 28 0 85
2016 1 59 67 57 0 184

Our costumes this year:

I didn’t actually pick a specific character this year, I just happened to like the pattern I found. I learned, however, that saying, “I’m a safari guy” or something to that effect wasn’t satisfactory to most people, who really wanted me to be a character. I had a few people think I was Dr. David Livingstone (“Dr. Livingstone, I presume.”) That’s fine, but it was interesting to see people struggle to attach a specific person to the outfit.

It makes me wonder how one might wear, say, just a historical reproduction costume or an original steampunk costume, and have that just work without it having to be someone specific. You can do that as a witch or a ghost, why not with other costume types?

I walked Phoenix around the neighborhood to do the trick-or-treating while Jenn handed out candy. This year Phoenix was far more into it (plus, no rain) so we went all over the neighborhood. At one point I actually had to pull out Google Maps because I couldn’t see the street signs and had gotten all turned around. We also nearly hit some houses twice since Phoenix really didn’t want to follow any orderly plan of attack.

Next year I think I’ll approach this in a more prepared fashion, with a map where I can mark down which street(s) we’ve hit and maximize the candy retrieval operation.

build, github, powershell, tfs comments edit

Git has a specific document on how to migrate Perforce to Git. The instructions here are based on the content there as well as some other “gotchas” and articles I ran into.

I’m using the git-p4 command rather than Perforce Helix Git Fusion. Git Fusion is a whole separate proxy-style service you need to set up that allows you to use Git clients to interact with a Perforce source control system. This makes it easy to migrate to a real Git back end, but it also is far more complex to set up for a one-time migration operation.

Oh, and you’ll probably notice I’m not really a Perforce user. I was tasked with migrating some Perforce stuff into Git recently and this is the process I pieced together. I may say some stuff that’s like, “Well, duh!” to folks who use Perforce more often.

Install Windows Tools

The tool installation and setup is based on the instructions here.

Chocolatey Install

If you use chocolatey, install is pretty quick.

choco install git
choco install python --version 2.7.11
choco install p4

Manual Install

You can manually install the requisite tools by downloading them and installing them from their respective pages:

Enable git-p4

The git-p4 Python script is installed when you install Git for Windows but it isn’t enabled by default. Run this command to add the p4 alias to git:

git config --global alias.p4 !"python 'C:/Program Files (x86)/Git/mingw32/libexec/git-core/git-p4'"

Once you have that enabled, you should be able to run git p4 and see results like this:

PS C:\Users\yourusername> git p4
usage: C:/Program Files (x86)/Git/mingw32/libexec/git-core/git-p4 <command> [options]
valid commands: clone, rollback, debug, commit, rebase, branches, sync, submit
Try C:/Program Files (x86)/Git/mingw32/libexec/git-core/git-p4 <command> --help for command specific help.
PS C:\Users\yourusername>

Set Perforce Environment Variables

The Perforce client needs environment variables so it knows which source control system to use, who you are, etc. You must have an account on the Perforce system to do this migration. Unlike Git, you can’t just anonymously clone the repo. If you want to try this out, you can get a free account on the public Perforce server and follow along cloning a public repo.

The example below shows use of the public Perforce depot.

#Powershell
$env:P4PORT = 'public.perforce.com:1666'
$env:P4USER = 'yourusername'
$env:P4PASSWD = 'yourpassword'
#cmd.exe
set P4PORT=public.perforce.com:1666
set P4USER=yourusername
set P4PASSWD=yourpassword

Clone the Perforce Repo with git p4

Cloning the Perforce repo is pretty simple, but making sure the branches in Perforce correctly map to branches in Git is a bit harder. The typical clone looks like this:

git p4 clone --detect-branches //guest/perforce_software/p4jenkins@all .

This example clones the Jenkins/Perforce integration project into the current directory. The @all specifier means all of the changesets through history will be brought in rather than just the latest.

If there are more complex branching strategies at play, this page on the Git site explains how to explicitly map folders to branches and so on.

Once the repo is cloned, Git sees the Perforce “repo” as a “remote” called “p4” that it can use to push changes back. Any branches it sees are attached only with the “p4” remote that it has added. We’ll fix that later.

Add a Remote to the New Git Repo

The way Git knows where to push the cloned data is by setting up a remote. Create the destination Git repo on the server and then…

git remote add origin https://github.com/yourusername/destinationrepo.git
git remote add p4 https://github.com/yourusername/destinationrepo.git

The first remote is added and is the usual/standard remote for a Git repo.

The second remote is added and called “p4” because the branches brought over are tied to a “p4” remote which is not actually defined in the repo by default. By adding this remote as a stand-in, you allow Git to bypass some logic that will fail when you try to move branches over when it sees “p4” doesn’t exist.

Bring Branches to the New Git Repo

As noted earlier, branches that the import creates are still associated with the “p4” remote. We need to bring those over to the new repo.

Here’s a Powershell script to do that:

(& git branch -r).Split([Environment]::Newline) |
%{ $_.Trim() } |
Where-Object { $_ -notlike "/master" -and $_ -like "p4/" } |
%{ (& git checkout --track "$_") }

This script…

  1. Uses the Git command line to list all the remote branches in the cloned local repository.
  2. Splits the output of the command line so Powershell can process each listed branch.
  3. Trims off leading and trailing whitespace on each listed branch.
  4. Finds all the branches that aren’t “master” (because that’s already available in the destination repo) and that start with “p4” (indicating the branch originated in Perforce).
  5. Checks out each of the branches from Perforce and starts tracking them in your local repository.

By tracking each of the “p4” branches in your local repo, it allows you to push those branches to the new Git remote repo. If you don’t do that, the branches won’t make the migration.

Push to the New Git Repo

Push the code, history, and branches all to the new repo.

git push -u origin --all

Remove the Fake p4 Remote

You don’t need the fake “p4” remote that the “git p4” command added since the branches are all moved over now. Remove it to avoid confusion.

git remote rm p4

personal, halloween, costumes comments edit

I love to sew. There’s something about making something tangible that I like. I’m sure it’s the same feeling people who do woodworking or metalworking get when they’re making something. Especially given I deal in the intangible all day, making something is cool.

I sew my Halloween costume every year. I try to do something bigger, better, and more complex each time (at least from a sewing standpoint). I don’t sew quite as much over the year, but Halloween is my holiday.

I have documented before what it takes to make my costume, but I’ve never really walked folks too deep into the step-by-step. This year I took it a little further and instead of focusing on cost and major steps, I figured I’d show full start-to-finish of what it takes. (I showed these same things in a Facebook photo album so if you want higher resolution or un-cropped images, check there.)

The first step is the pattern.

I used Butterick pattern B6340, which they rate as an “advanced” pattern. Normally when you buy a costume pattern, they’re “beginner” or “intermediate,” depending on whether or not it’s lined or super detailed. Things that are closer to historical recreation or that have a lot of detail get into “advanced” which boils down to “more intricate steps.”

The back of the pattern looks like this and tells you how much fabric you need.

Butterick Pattern B6340

I ended up having to buy something like eight yards of fabric for the costume, which amounts to just buying the whole bolt. I also had lining and some accent fabrics.

When you get the fabric home, you have to wash it to pre-shrink it and get the sizing out that ships on the fabric. Then you have to iron it. Here’s what it looks like to throw eight yards of fabric on the ironing board.

Ironing the main fabric

The pattern itself comes in large sheets of tissue paper. You have to iron the pattern, too (on a very low setting) to get the creases out. That helps in cutting the pattern and makes sure when you cut your fabric you’ll get things the right size.

The pattern tissue sheets

After cutting out the pattern, you’ll have a stack of pattern pieces. I have mine separated between the coat (top pile) and the pants (bottom pile).

The cut pattern pieces

Once you’ve got the pattern cut out, it’s time to pin the pattern to the fabric and cut along the edges. This takes a long time and is the most tedious part of the whole process because not only do you cut out the pieces but you also have to transfer the little markings and lines from the pattern to your fabric. Those markings tell you where to fold, sew, cut, and line pieces up.

The top of this picture shows a stack of pieces I’ve cut; the bottom is some items pinned.

Pinning and cutting

Here’s what it looks like when all the pieces are cut out of all the fabric. It’s a big stack of puzzle pieces.

All the pieces cut out

After cutting the pieces out I put together the coat.

On the coat, there are a lot of pieces that give the body shape and rigidity. You sew a fairly rigid fabric called “interfacing” to those pieces. Here’s the interfacing all sewn to the coat pieces.

Interfacing in the coat pieces

After that, it’s time to get the front sections sewn. Here’s the right front part of the jacket.

Right front of the jacket

Once both front pieces and the back are sewn on, you have a sort of “vest” that you can wear and start to size.

The coat in 'vest' form

The coat has pockets on the front, so here’s what making those pockets looks like. The tan one on the top left is a “finished” pocket that will get sewn to the coat; the green one on the bottom is the second pocket, just not turned inside out yet.

The pockets on the jacket are lined, so once they’re sewn down you’ll see green lining inside, not just tan fabric.

Jacket pockets

After making the bottoms of the pockets, sewing those on, and then putting flaps and buttons over the top, here’s what the finished pockets look like attached to the jacket.

Pockets attached to the jacket

With the body of the coat done, it’s time for the sleeves. These are basically fabric tubes, but with a bit of extra fabric at the top. That extra fabric helps give your shoulders room to move and makes sure the arms aren’t literally pointing straight out from the jacket. (Look at your jacket - the arms hang down fairly evenly, they don’t stick straight out.)

In my case, the arms are also somewhat tailored so they have a slight bend at the elbow.

Arms for the jacket

Here’s what it looks like to attach an arm to the body of the jacket.

The top picture shows how you have to pin the arm to the jacket arm hole. There is some gathering to do because the distance around the arm hole on the jacket is actually less than the distance around the top of the arm hole on the arm. A lot of sewing is trying to fudge this stuff to make it fit for one reason or another. Sometimes it’s because you’re a quarter inch off in cutting something. Sometimes it’s because something stretched while you were sewing.

In this case, arm holes are always like this. It’s so your shoulder fits in well and so the fabric moves without being tight.

The middle picture shows what it looks like after the sewing is done and the pins are out.

The bottom picture shows the finished arm from the outside of the coat.

Sewing in an arm

Once the arms are in, it starts looking like a jacket.

(I skipped the steps where I attached the collar. You didn’t notice that, right? They were kinda boring anyway.)

Arms attached to the jacket

Once the outside of the jacket is done, it’s lining time.

Making a lining is a lot like making a slightly smaller version of the jacket, just with lighter fabric and inside-out.

Here I’ve put together the front parts of the lining. The left shows pinning the green lining fabric to some tan facing (so the lining doesn’t go right up to the edge where you button the jacket).

Front lining

Sew the front and back lining together, and you have a little vest - just like making the jacket.

Front and back lining connected

Add some lining sleeves and the inside part of the collar and you’ve got an inside-out version of the jacket.

The complete lining

Now it’s time to attach the lining to the jacket.

I put the shoulder pads in place and sewed the jacket half of the collar to the lining half of the collar.

Starting to put the lining in

This pattern uses a technique called “bagging the lining” to put the lining in. This lets you put the lining in with the sewing machine doing most of the work so it goes quicker.

Well, it goes quicker if you’ve done it before. This was the first time I’d tried it. I can see how it could be a time and effort saver, but figuring it out the first time was sort of painful.

Basically, you sew the outside of the lining to the edges of the jacket and leave a tiny hole in one of the seams in the arm lining. Once you’ve got the jacket and lining attached, flip the code right-side-out through the arm lining hole and sew up that small hole by hand.

My usual method of lining involves a lot of hand sewing so this was a nice change.

The lining attached to the jacket

After flipping it right-side-out I found a couple of weird things I had to fix in the corner of the jacket where the lining meets the jacket front.

Jacket lining gathering at the corner

Luckily I was able to do a minimal amount of work to fix it.

The jacket lining gathering fixed

With the lining in, the jacket is almost complete!

Lining fully in the jacket

Last step: the belt!

The belt for the jacket

Here’s the completed jacket after all that work.

The completed jacket

Now for the pants.

The first step in the pants is to put a couple of small front pockets in.

From left to right, top to bottom: The pocket lining sewn along the top of the waist; the lining flipped down and pinned; the pocket lining sewn with pins removed; the finished pocket as seen from the front.

The front pocket on the pants

There are side pockets, too. Here are a couple of facing pieces attached to the pocket lining. The facing makes it so putting your hands in your pockets doesn’t expose green lining.

Side pocket lining

Once you’ve attached the side pocket fronts to the pants front, it looks like this (one pocket per leg).

Side pocket fronts attached

The front sides have a waistband, so you have to attach that after the pockets for a nice finished edge.

Side waistband attached

Skipping ahead a bit, here are the back halves of the legs sewn together. These will get sewn to the front halves to be a full pair of pants.

Back leg halves sewn together

The center front also has a waistband. Here’s what that looks like when it’s not attached.

That white fabric you see in there is the interfacing I mentioned earlier.

Front waistband

Here’s the front waistband attached to the front of the pants. Remember those little front pockets I made earlier? You see them here. The close right at the waistband so I put some tools in them so you could see.

The top picture is what you’d see from the front. The bottom picture is the inside of the pants front.

Pants front waistband attached

These particular pants have patches on the insides of the legs. I put some microsuede in for mine so it looks like leather but was cheaper and easier to work with.

Leg patches in place

Once the front is sewn to the back, you can actually try the pants on.

In the picture, they’re pinned together since I haven’t put buttons in yet. You’ll also see the legs look a little baggy. These pants have buttons down the sides of the legs to tighten them up. (I skipped showing those steps - again, hard to see, a little tedious.)

First fitting of the pants

Time to put button holes in.

This is a glimpse at some of the pain that shows up unexpectedly while working.

Sewing machines nowadays are great about putting button holes of all shapes and sizes into your clothes, but they don’t tell you when you start the button hole whether or not you have enough thread in the machine to finish the button hole.

You can’t “put in more thread and pick up where you left off.” It’s pretty “all or nothing.” So… when your thread runs out mid-button-hole, you get to pull out the seam ripper and very, very gently rip out all those tiny stitches and try again.

Failed partial button hole

Here I have all the button holes put into the pants. There are 26 button holes in all that I had to make: eight on each leg, four up each side, two in the middle.

Button holes complete

Once you have button holes, you gotta put on the buttons.

Here are the leg buttons done…

Leg buttons in place

…and the side buttons getting put in…

Side buttons going in

That’s the last step of the pants. After a little fitting and adding some belt loops, the pants looked pretty decent.

The finished pants

Pants plus coat equals costume!

With the pants and the coat finished, I just had to add my accessories: pith helmet, riding half chaps to cover my boots, and binoculars.

The complete costume!

In all, I think it turned out pretty well.

javascript comments edit

I was working on my annual PTO schedule and thought it would be nice to collaborate on it with my wife, but also make it easy to visually indicate which days I was taking off.

Google Sheets is great for that sort of thing, so I started out with the calendar template. Then I wanted to highlight (with a background color) which days I was taking off.

That works well, but then I also wanted to see how many days I was planning to make sure I didn’t use too many vacation days.

How do you count cells in Google Sheets by background color?

One way is to use the “Power Tools” add-on in Sheets. You have to use the “Pro” version if you go that route, so consider that. I think the pro version is still free right now.

I did try that and had some trouble getting it to work. Maybe I was just doing it wrong. The count was always zero.

Instead, I wrote a script to do this. It was based on this StackOverflow question but I wanted my function to be parameterized, where the stuff in the question wasn’t.

First, go to “Tools > Script Editor…“ in your sheet and paste in this script:

/**
 * Counts the number of items with a given background.
 *
 * @param {String} color The hex background color to count.
 * @param {String} inputRange The range of cells to check for the background color.
 * @return {Number} The number of cells with a matching background.
 */
function countBackground(color, inputRange) {
  var inputRangeCells = SpreadsheetApp.getActiveSheet().getRange(inputRange);
  var rowColors = inputRangeCells.getBackgrounds();
  var count = 0;

  for(var r = 0; r < rowColors.length; r++) {
    var cellColors = rowColors[r];
    for(var c = 0; c < cellColors.length; c++) {
      if(cellColors[c] == color) {
        count++;
      }
    }
  }

  return count;
}

Once that’s in, you can save and exit the script editor.

Back in your sheet, use the new function by entering it like a formula, like this:

=countBackground("#00ff00", "B12:X17")

It takes two parameters:

  • The first parameter is the color of background highlight. It’s a hexadecimal color since that’s how Sheets stores it. The example I showed above is the bright green background color.
  • The second parameter is the cell range you want the function to look at. This is in the current sheet. In the example, I’m looking at the range from B12 through X17.

Gotcha: Sheets caches function results. I found that Google Sheets caches the output of custom function execution. What that means is that you enter the function (like the example above), it runs and calculates the number of items with the specified background, and then it won’t automatically run again. You change the background of one of the cells, the function doesn’t just run again and the value of the count/total doesn’t update. This is a Google Sheets thing, trying to optimize performance. What it means for you is that if you change cell backgrounds, you need to change the function temporarily to get it to update.

For example, say you have a cell that has this:

=countBackground("#00ff00", "B12:X17")

You update some background colors and want your count to update. Change the function to, say, look at a different range temporarily:

=countBackground("#00ff00", "B12:X18")

Then change it back:

=countBackground("#00ff00", "B12:X17")

By changing it, you force Google Sheets to re-run it. I haven’t found any button or control to force the methods to update or re-run so this is the way I’ve been tricking it.