dotnet, ndepend comments edit

I’ve been using NDepend for a while – since version 2.7 – and each release is always noticeably better than the last. Version 4 last year brought with it some of the best stuff with CQLinq and seemed to focus a lot on enhancing the internals and technical usefulness. The latest version, version 5, focuses on the UI and the general user experience.

The NDepend site actually has a great overview of the new features, and Patrick Smacchia has a sort of case study explaining the UI enhancements, so I suggest you check those out.

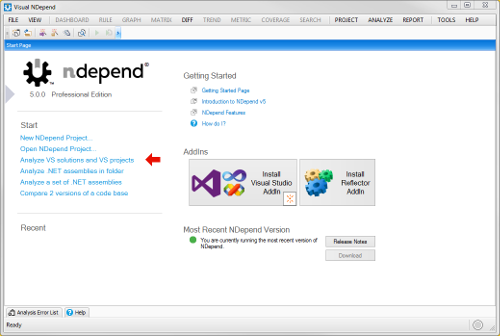
The UI enhancements are immediately apparent when you fire up the application.

NDepend 5 startup
screen

Everything is a lot cleaner and more modern feeling. You don’t realize how much of an impact that has on it until you’re actually using it.

Things are generally much easier to find and figuring out “what to do next” after running analysis isn’t nearly as challenging as it used to be. My complaint from version 4 about the UI being a bit confusing is pretty much gone. The updated menus combined with the dashboard screen (see below) have pretty well solved that issue.

The two coolest improvements that immediately caught my eye were the new dashboard and the update to the HTML report format.

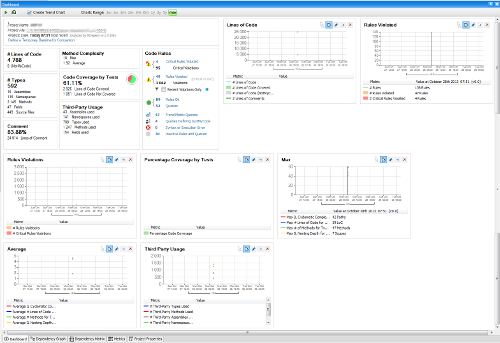
On running the analysis, you are now presented with a dashboard screen that has several metrics and trend graphs. Particularly from a long-term reporting standpoint, these trend graphs are fantastic. You can track how the application is changing over time and very easily communicate that in a visual format. (My screen shot below doesn’t show trends because I only ran it once but you see where they’d go and so on.)

The new NDepend dashboard screen with trend
graphs

You can customize that dashboard to your heart’s content – every graph has a little set of editing buttons that let you customize and the definitions for those are all stored along with the project.

The HTML report is now also much cleaner. It offers the same great level of detail, but the presentation is such that it’s not all on One Gigantic Page.

HTML report from
NDepend

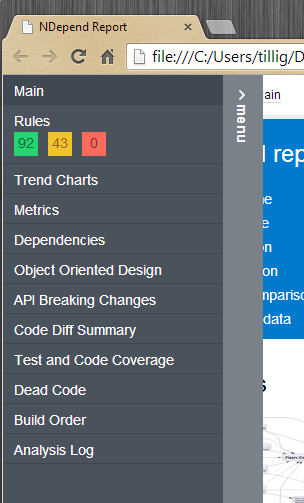
The navigation menu on the side slides out when you mouseover and that’s how you get to the detailed info.

NDepend report
menu

One really cool internal enhancement is that you can define what JustMyCode means so your queries over JustMyCode are more precise. You do this by prefixing your query with notmycode like:

notmycode
from a in Application.Assemblies where
!a.NameLike("Foo")
select new { a, a.NbILInstructions }

That way when you query over JustMyCode you get a more specific set of results:

// This will behave based on your definition of JustMyCode
warnif count > 0 from t in JustMyCode.Types where
t.NbLinesOfCode > 500
orderby t.NbLinesOfCode descending
select new { t, t.NbLinesOfCode }

Really slick.

I mentioned to Patrick that it would be nice to be able to define “named code sets” in a similar fashion and reuse those in other queries. In my case, I have a fairly large application, but some of the application assemblies that I want analyzed shouldn’t be counted against the application in coverage analysis. There’s no way to exclude full assemblies from coverage reporting easily because there are several queries that define the metrics – you’d have to copy/paste the “where” clauses across all of them and keep them in sync. Instead, it’d be cool if you could do something similar to the JustMyCode thing where you could define a named set of code (e.g., the set of assemblies on which I want coverage analysis) and then reuse that named set in coverage queries – update the definition once, all the coverage queries get updated.

My number one issue with NDepend still persists to version 5 – you still can’t use environment variables in framework folder paths. Just as in version 4, this is sort of a showstopper when it comes to running NDepend in server farms as part of your build process where the Windows folder and Program Files folder are potentially not on the same drive on every server.

Regardless, NDepend 5 is definitely worth the upgrade. It’s clean and modern, much easier to use, the reports are easier to navigate, and it remains one of the more valuable tools in my toolbox. Head over to NDepend and check it out. The base of overview videos and documentation has been constantly growing so you can actually see it in action doing pretty much anything.

Full disclosure: I got a free personal license from Patrick at NDepend. However, we have also purchased several licenses at work and make use of it to great benefit.

General Ramblings comments edit

I admit, I have sort of a love-hate relationship with my toddler. I love her so much and she’s so cute and friendly and fun… when she’s in a good mood. When she’s in a bad mood, or doing her “testing boundaries” thing, I want to throttle her.

Where I’m going with that is that I look for things that we can both enjoy together – activities we can sort of “bond” over, where we’re both having a good time. Sometimes this means racing hippity-hop balls around the house, but I can’t really run around for hours (or let her ride my back for hours) like she wants, so finding “quieter” activities is good.

Jenn usually gives Phoe her phone on the way home from day care so Phoe can pick whatever she wants to watch from Netflix. Phoe has now taken to watching Doctor Who of her own volition. She’ll scroll around and look for it.

So the new quiet activity now is watchingDoctor Who together. “Daddy, I watch Doctor with you. We watch Doctor together.” Yes, yes we will.

I’ll get her a cup of juice, get myself a Coke or something, and we’ll sit down and watch an episode. She’ll reach her cup over and go, “Cheers!” and we’ll clink together and drink.

She likes to point out the characters. “That’s the Doctor, Daddy.” Yes, that’s the Doctor. “That’s Martha. She doctor, too.” Yes, Martha’s a doctor, too, but not the same kind of doctor. (We’re heading out of third season into fourth.) “Oh, Daddy, he bad guy. Doctor need stop the bad guy.” The Doctor will get him, honey. You know he will. “Cheers!” *clink*

And when one episode ends: “We watch that again, Daddy!” Good girl. My job here is done.

dotnet, gists, aspnet, csharp comments edit

One of the new ASP.NET MVC 5 features, authentication filters, has dreadfully little documentation. There’s a Visual Studio Magazine article on it, but that basically replicates the AuthorizeAttribute in a different way. It doesn’t really explain much else.

Diving into the source doesn’t tell you too much, either. The context you get in the filter has a little more of an idea about what you should be doing, but… it’s really not enough.

The real magic happens in the ControllerActionInvoker.InvokeAction method. The source shows that the general flow is like this:

  1. MVC action gets selected.
  2. IAuthenticationFilter.OnAuthentication executes.
  3. If there is any result set from OnAuthentication, then IAuthenticationFilter.OnAuthenticationChallenge executes.
  4. IAuthorizationFilter.OnAuthorization executes. (The AuthorizeAttribute.)
  5. If there is any result set from OnAuthorization, then IAuthenticationFilter.OnAuthenticationChallenge executes.
  6. Assuming the user is authenticated/authorized, the controller action executes.
  7. IAuthenticationFilter.OnAuthentication executes.

From the comments in the code, it appears the intent is that you somehow “chain” action results together. I’m not sure what that means, whether there’s a decorator pattern intended or whether the design assumes that authentication challenges would just add specific HTTP headers to the response or what.

However, here’s a simple scenario that I came up with that lets you inject some sort of security challenge into a UI flow using the IAuthenticationFilter.

First, let’s create a custom result type. We’ll use this result as a “flag” in the system to indicate the user needs to be challenged. We’ll derive it from HttpUnauthorizedResult so if, for whatever reason, it “slips through the system,” the user will be denied access.

public class ChallengeResult : HttpUnauthorizedResult
{
  public ChallengeResult(string postAction)
  {
    this.PostAction = postAction;
  }

  public string PostAction { get; private set; }
}

The result stores the location where the user needs to return in order to complete the operation after they’ve been challenged.

Next, let’s create our filter. This filter won’t do anything during the authentication portion of its lifecycle, but it will handle challenges. In this case, it’ll look for our challenge result and take action if the user needs to be challenged.

public class ChallengeFilter : IAuthenticationFilter
{
  public void OnAuthentication(AuthenticationContext filterContext)
  {
    // Do nothing.
  }

  public void OnAuthenticationChallenge(AuthenticationChallengeContext filterContext)
  {
    var result = filterContext.Result as ChallengeResult;
    if (result == null)
    {
      // If it's something other than needing a challenge, move on.
      return;
    }

    // Save the location where the user needs to be returned.
    filterContext.RequestContext.HttpContext.Session["postAction"] = result.PostAction;

    // Send the user to be challenged.
    var helper = new UrlHelper(filterContext.RequestContext);
    var url = helper.Action("Index", "Challenge");
    filterContext.Result = new RedirectResult(url);
  }
}

You’ll notice the filter sends the user to a challenge controller. That’s the controller with the form that requires the user to answer a question or re-enter credentials or whatever. We’ll come back to that in a second. Before we do that, let’s see how we’d consume this filter so we can get challenged.

Here’s what you do in the controller where you need to issue a challenge:

  • Check to see if the user’s authorized. If they are, let the operation proceed.
  • If they’re not…
    • Store any form state you’ll need to complete the operation.
    • Issue the challenge result so the filter can pick it up.

A very, very simple controller might look like this:

public class DoWorkController
{
  public ActionResult Index()
  {
    // Display the view where the user enters
    // data or whatever.
    return View();
  }

  [HttpPost]
  [ActionName("Index")]
  [ValidateAntiForgeryToken]
  public ActionResult IndexNext(Model model)
  {
    // Handle form submission - POST/REDIRECT/GET.
    if (!this.ModelState.IsValid)
    {
      return View(model);
    }

    // Store the data so we can use it in later steps
    // and possibly in the challenge.
    this.Session["data"] = model;
    return this.RedirectToAction("Review");
  }

  public ActionResult Review()
  {
    var model = (Model)this.Session["data"];
    return View(model);
  }

  [HttpPost]
  [ActionName("Review")]
  [ValidateAntiForgeryToken]
  public ActionResult ReviewNext()
  {
    var model = (Model)this.Session["data"];
    var authorized = this.Session["authorized"];

    // Here's where you determine if the user needs to
    // be challenged.
    if (UserNeedsChallenge(model) && authorized == null)
    {
      // On successful challenge, POST back to the Review action.
      return new ChallengeResult(this.Url.Action("Review"));
    }

    // If the user gets here, they're authorized or don't need
    // a challenge. Do the work, clear any authorization status,
    // and issue a confirmation view.
    PerformWork(model);
    this.Session.Remove("authorized");
    return this.RedirectToAction("Confirm");
  }

  public ActionResult Confirm()
  {
    // Display some sort of success message about
    // the operation performed.
    var model = (Model)this.Session["data"];
    return View(model);
  }
}

This is obviously not copy/paste ready for use. There are all sorts of things wrong with that sample, like the fact the session data is never cleared, we don’t have the ability to handle multiple windows running multiple operations at a time, and so on. The idea holds, though – you need to persist the form data somewhere so you can send the user over to be challenged and then resume the operation when you come back. Maybe you can create a service that holds that information in a database; maybe you invent a backing store in session that has a more “keyed” approach so each operation has a unique ID. Whatever it is, the important part is that persistence.

OK, so now we have a custom result, a filter that looks for that result and sends the user to be challenged, and a controller that uses some business logic to determine if the user needs the challenge.

The next piece is the challenge controller. This is the controller that asks the user a question, prompts for credentials, or whatever, and resumes the operation once the user successfully answers.

I won’t put the whole controller in here – that’s up to you. But on successfully answering the question, that’s the tricky bit. If you’re doing things right, you’re not doing anything “important” (deleting records, modifying data) on a GET request, so you will need to issue a POST to the appropriate endpoint. You also have to mark the operation as authorized so the POST to the original controller will skip the challenge.

And don’t forget handling the unauthorized scenario - if the user fails the challenge, you don’t want them to be able to “go back and try again”so you need to clear out all the state related to the operation.

public class ChallengeController : Controller
{
  // Other actions in this controller should take care of
  // running the user through the gamut of questions or
  // challenges. In the end, after the final challenge is
  // verified, you need to resume the transaction.
  [HttpPost]
  [ValidateAntiForgeryToken]
  public ActionResult VerifyAnswer(ChallengeModel challenge)
  {
    if (!this.ModelState.IsValid)
    {
      return this.View(challenge);
    }

    // Remove the POST action. It's make-it-or-break-it time.
    var postAction = this.Session["postAction"].ToString();
    this.Session.Remove("postAction");

    if(!AnswerIsCorrect(challenge.Answer))
    {
      // If the user doesn't make it through all the challenges,
      // clear the data and deny them access.
      this.Session.Remove("authorized");
      this.Session.Remove("data");
      return RedirectToAction("Denied");
    }

    // If they do get the challenge right, authorize the operation
    // and resume where they left off. Send them to a special "success"
    // view with the post action.
    this.Session["authorized"] = true;
    return this.View("Success", postAction);
  }
}

Again, this is not copy/paste ready. It’s just to show you the general premise – if they fail the challenge, you need to remember to clean things up and totally deny access; if they succeed, authorize the challenge and send them on their way.

The final question is in that Success view how to resume the transaction. The easiest way is to issue a very tiny view with a POST action to the original location and auto-submit it via script. That might look something like this:

@model string
@{
  Layout = null;
}
<!DOCTYPE html>
<html><head><title>Successful Authorization</title></head>
<body>
<form method="post" action="@this.Model" id="successform">
@Html.AntiForgeryToken()
<input type="submit" value="Process Transaction" />
</form>
<script>document.getElementById("successform").submit();</script>
</body>
</html>

Nothing too fancy, but works like a charm.

Now when the user succeeds, this form will load up, a POST will be issued back to the original controller doing work, and since the authorization value is set, the user won’t be challenged again – everything will just succeed.

Last thing to do – register that challenge filter in the global filters collection. That way when you issue the challenge result from your controller, the filter will catch it and do the redirect.

public class FilterConfig
{
  public static void RegisterGlobalFilters(GlobalFilterCollection filters)
  {
    filters.Add(new AuthorizeAttribute());
    filters.Add(new HandleErrorAttribute());

    // Add that challenge filter!
    filters.Add(new ChallengeFilter());
  }
}

You’re done! You’re now using the IAuthenticationFilter to issue a challenge to verify a transaction prior to committing it. This is what I see the primary value of the new IAuthenticationFilter as being, though I wish there was a bit more guidance around it.

There’s a huge, huge ton of room for improvement in the stuff I showed you above. Please, please, please do not just copy/paste it into your app and start using it like it’s production-ready. You need to integrate your own business logic for challenging people. You need to make sure people can’t start two different transactions, authorize one, and then complete the other one. You need to protect yourself against all the standard OWASP stuff. What I’ve shown you here is proof-of-concept spike level stuff that probably would have been really difficult to follow if I put in all the bells and whistles. I’ll leave that as an exercise to the reader.

Minor aside: It seems to me that there’s some ambiguity between “authentication” and “authorization” here. The AuthorizeAttribute sort of mixes the two, determining both if the user’s authenticated (they have identified themselves) and, optionally, if the user is in a specific role or has a specific name. The IAuthenticationFilter runs before authorization, which is correct, but with the addition of the ability to challenge built in… it seems that it’s more suited to authorization – I’ve already proved who I am, but I may need to be challenged to elevate my privileges or something, which is an authorization thing.

net comments edit

I just had an interesting unit test failure I haven’t seen before due to DateTime calculation.

The code under test was roughly like this:

public Lifetime GetTokenLifetime(int seconds)
{
  return new Lifetime(DateTime.UtcNow, DateTime.UtcNow.AddSeconds(seconds));
}

The unit test was also pretty straightforward:

[Test]
public GetTokenLifetime_ExpectedLifetime()
{
  var provider = new Provider();
  var lifetime = provider.GetTokenLifetime(120);
  Assert.AreEqual(120, lifetime.Seconds);
}

The test was intermittently failing… and the error pretty much explained why:

Expected: 120
Actual: 120.0000063d

There was just a tiny fraction of a second happening between the first DateTime.UtcNow call and the second DateTime.UtcNow call.

To fix it, I stored the DateTime in a local variable.

public Lifetime GetTokenLifetime(int seconds)
{
  var now = DateTime.UtcNow;
  return new Lifetime(now, now.AddSeconds(seconds));
}

Something to keep in the back of your mind as you’re working with DateTime - or times in general. If you are setting up a date range based on a fixed point, best to store that fixed point somewhere and reuse it.

gaming, xbox comments edit

I haven’t blogged much about games I’m playing recently, so given I’m “between games” at the moment, I figured I’d talk a bit.

Yesterday, after about 172 hours, I finished Skyrim with 1000/1000 achievements. I probably could have finished sooner, but I did spend quite a bit of time building up my various skills and running non-required side missions before getting to the main story. I didn’t get any of the DLC, so the time doesn’t include that.

Back in 2006 I played through Oblivion with a buddy of mine and I don’t remember it being nearly this big. I do remember it being more “grindy” – having to jump a lot to build up stamina, or run everywhere to build up strength. I don’t feel like Skyrim was quite like that, but there was a fair amount of tedium. The alchemy thing – having to make potions – was annoying and tedious. I think there were too many possible combinations of things, too many ingredients. Mining ore to refine into metal ingots that could be fashioned into armor or weapons that you’d then have to improve… yeah, that was pretty tedious, too. But I think the most tedious thing was selling stuff. I had so much stuff to sell and no one had enough money to buy it all. I’d stick it in a chest in my house intending to come back and sell it when I needed money… but I never needed money. I had so much money I couldn’t spend it all. I really wish you could set up sort of a… well, like a consignment deal with the local merchants. Deposit your unwanted stuff in a chest in the shop and over the course of time they’d just take stuff out and put money in.

That’s not to say I didn’t have fun. Skyrim was, for me, incredibly addictive. Just one more mission, just one more quest… and even though a lot of it was sort of the same, I didn’t really get tired of it. If I didn’t have Grand Theft Auto 5 to get to next, I’d go for the DLC on Skyrim.

I played a female orc character, though I spent far too much time getting her to look right considering I play in first person view so I never actually saw her except in a couple of cut scenes after that. I think you had to name your character, too, but they never used her name, or not enough to remember. I think in a couple of ransom notes or something.

What I liked most about Skyrim was how I actually kind of got to know and like (or dislike) some of the NPC characters. Cicero, from the Dark Brotherhood, I hated. I hated him from the first time I met him. He was annoying and whiny. I sold him off to the Blades. The whole battle between the Stormcloaks and the Empire was cool, too – the whole world changes when you decide who to side with and it makes it feel so real and important.

And you could get married in the game, which was neat. I ended up marrying Lydia, my housecarl from Whiterun. It didn’t make sense to me to marry anyone else. She was the first “follower” I got; she was always there and friendly when I went to my house to drop stuff off; and she’s the only real NPC who was totally loyal – she doesn’t stab you in the back or send you on a stupid quest. When I thought about which NPC to marry, it didn’t even occur to me to pick anyone else, like it’d be in-game “cheating” or something. I sort of surprised myself when I felt like that, like it actually mattered somehow, which just speaks to the depth of the game.

Before Skyrim, I ran through Borderlands 2. I got the season pass for that so I’ve run through all the DLC, too, with the exception of this latest “Tiny Tina’s Assault on Dragon Keep.”

I loved the first Borderlands, and this second one didn’t disappoint. Bigger, better, faster, stronger. Great characters, great writing. Some of the Claptrap jokes actually made me laugh out loud and when I think back I still giggle. (“WHY AREN’T YOU LAUGHING? THAT WAS COMING F\^&*ING GOLD!”)

I had intended to play through it co-op with my dad and uncle, but with our various life commitments it was really hard to get together on a consistent basis. In the end, we all ended up playing through on our own, teaming up occasionally for harder battles.

That’s the biggest problem I had with this latest Borderlands. It pretty much assumed you had a group of four people to run through the game with. The harder guys – no way you can beat them on your own. And even some of the DLC was super hard until you really leveled up and were a few levels above the bad guys. I never did kill most of the “Blah the Impossible” or “Blah the Invincible” characters. I got in there with my dad and uncle, we all died enough times that we lost millions, and we still couldn’t kill these guys. I don’t mind a challenge, and I’m a fairly decent player, but it got pretty ridiculous in there. Watching YouTube videos and reading forums for strategy, I wondered where people were getting these full inventories of super-rare weapons, which I have to assume is because they went through the whole rest of the game with the team of people. What about the solo Vault Hunters?

I played through with a couple of different characters, and with one of my characters I played through twice. After all that, plus the DLC, plus the ridiculous challenge in places… it burned me out. I will probably return to it at some point to get through Tiny Tina’s DLC, but it’ll be a bit.

Somewhere in there I played through BioShock Infinite. I liked it, as I liked the rest of the BioShock franchise, but I didn’t feel all blown away by the ending the way many folks did. The game play was fun, the environments very immersive, and I did love the characters. Some of the “jumping onto skyhook lines” stuff got a little frantic. It was a neat idea, but seemed to make it a little more complex than it should have been. I didn’t play through the DLC in that, and I may at some point since they’ll be returning to Rapture, but, again, after GTA5.