dotnet, gists, aspnet comments edit

We have a custom VirtualPathProvider that serves some static files (*.js, *.css) from embedded resources in assemblies. It is similar in function to the WebResource.axd that ships with ASP.NET, but instead of having some crazy URL, you just access the file directly and the VPP finds it in embedded resources and serves it just like it was on the disk. It makes for a nice deployment experience and easy upgrade.

The problem I’ve run into a bunch, particularly with routing showing up, is that even with a wildcard map to ASP.NET, my static files end up with a 404 error code because routing is catching them, sending the requests to the MVC handler, and no route is found. Fail.

So, as a note to myself (and anyone else who’s doing something similar), here’s what I’ve found you need to do to get your VPP serving up static files.

First, you need to get the desired static file types mapped to ASP.NET. In an integrated pipeline, that means adding the StaticFileHandler in your web.config (or doing some other machinations, based on your setup, but the web.config method makes it easy and controlled from the web app rather than the IIS console). A snippet of web.config looks like this:

<?xml version="1.0"?>
<configuration>
  <system.webServer>
    <handlers>
      <add name="AspNetStaticFileHandler-GIF" path="*.gif" verb="GET,HEAD" type="System.Web.StaticFileHandler"/>
      <add name="AspNetStaticFileHandler-JPG" path="*.jpg" verb="GET,HEAD" type="System.Web.StaticFileHandler"/>
      <add name="AspNetStaticFileHandler-CSS" path="*.css" verb="GET,HEAD" type="System.Web.StaticFileHandler"/>
      <add name="AspNetStaticFileHandler-JS" path="*.js" verb="GET,HEAD" type="System.Web.StaticFileHandler"/>
    </handlers>
  </system.webServer>
</configuration>

Obviously you’ll have a whole bunch of other stuff in your web.config, but this is the relevant bit here. Make sure the static file handlers are the last handler entries in your web.config.

UPDATE/IMPORTANT: In the original post for this article I set a wildcard mapping to AspNetStaticFileHandler. That actually messes other things up. For example, it starts serving web form .aspx files as text files directly. Not good. Instead, map the static file handler directly ONLY to the static file types you plan on serving.

Now the problem is that ASP.NET routing is going to pick up every incoming request for those file types and you’ll end up with a 404 when the request doesn’t match any route. This is the problem that is so hard to debug - your VirtualPathProvider.FileExists method will be properly called to determine whether the file can be served up… but then you get a 404 without ever getting your VirtualPathProvider.GetFile method to try and serve the thing up. WTF?! The answer is to ignore routes to the static files.

In Global.asax, in your RegisterRoutes method, set it up so static file extensions get ignored. This is based on Phil Haack’s blog entry about ignoring requests for a certain file extension:

routes.IgnoreRoute("{*staticfile}", new { staticfile = @".*\.(css|js|gif|jpg)(/.*)?" });

Now when you make a request for your static file, it will properly be served up by your VirtualPathProvider and won’t have to be in the filesystem.

dotnet, vs, testing, gists comments edit

With the ability to transform your web.config file when deploying your web site came, at least for me, a question: How do I test my web site’s behavior without deploying a whole copy of my web site?

I figured out a reasonable, if slightly kludgy, solution and I figured I’d share. The general idea is to have a project in Visual Studio that…

  • Acts as the point of entry for debugging the packaged version of the web site.
  • Automatically updates IIS Express configuration to point to the packaged web site.

What it allows you to do is hit F5 and IIS Express will start up pointed to the packaged version of the web site rather than the one in your source tree. It’ll have the transformed web.config (and any other build-time changes) so you’ll be debugging what would normally be deployed.

First, create an empty class library project in your solution. You won’t actually put code in here; it’s a marker that you can use as the Debug startup project. I called mine DebugPlaceholder.

Next, add a Project Reference in your debug placeholder project to all of the web sites you want to have set up automatically in IIS Express.

Now it’s time to manually edit the debug placeholder project a bit. Open the debug placeholder .csproj in a text editor.

Scroll down until you find the list of project references. Inside each ProjectReference node

  • Add a node called IISExpressUrl. Inside that node put the URL that IIS Express will host the site on.
  • Add a node called IISExpressBindings. This is another way of writing the URL, but in IIS binding format.

A sample modified ProjectReference node looks like this:

<ProjectReference Include="..\MyWebApplication\MyWebApplication.csproj">
  <Project>{8F2D1C2C-E12D-4880-B731-66F5051A6EF1}</Project>
  <Name>ChannelWebApplication</Name>
  <IISExpressUrl>http://localhost:22446</IISExpressUrl>
  <IISExpressBindings>http/*:22446:localhost</IISExpressBindings>
</ProjectReference>

Again, the URL and Bindings listed up there need to match (note the port in each matches) and they need to be unique for each project. (IIS Express can’t host multiple sites at the same listening destination.) The path to the project, the project GUID, and the project Name will, of course, be your own values that were put there when you added the project reference.

IMPORTANT: The endpoint you list in the project references can’t be the same as the one you have set up in the Web settings of your web application. The problem is that you can’t stop VS from launching IIS Express (or the Visual Studio dev server, or whatever) when you start debugging, so if you have your web application, say, configured to listen to port 22446 and you have your debug placeholder set to configure the deployed project to 22446, then you’ll get a failure. I’m not sure this is really a limitation since you probably shouldn’t have anything in your web app that’s glued to the specific port anyway.

What you just did was add some metadata to each project reference that you can use later. We’ll use it in the AfterBuild target.

Scroll down to almost the bottom of the debug placeholder .csproj and uncomment the AfterBuild target.

Inside the AfterBuild target, put these three lines:

<MSBuild Projects="%(ProjectReference.FullPath)" Targets="Package" Properties="Configuration=$(Configuration);Platform=$(Platform)" />
<Exec Command="&quot;$(MSBuildProgramFiles32)\IIS Express\appcmd.exe&quot; delete site %(ProjectReference.IISExpressUrl)" ContinueOnError="true" />
<Exec Command="&quot;$(MSBuildProgramFiles32)\IIS Express\appcmd.exe&quot; add site /name:&quot;%(ProjectReference.Name)&quot; /bindings:%(ProjectReference.IISExpressBindings) /physicalPath:&quot;%(ProjectReference.RootDir)%(ProjectReference.Directory)obj\$(Configuration)\Package\PackageTmp&quot;" />

What those do:

  • Run the “Package” target on the web application projects that you’ve referenced.
  • Deletes and then re-adds the IIS Express configuration that points to the referenced projects. (That way if you’ve got multiple copies of the source checked out, you’ll be sure to always be pointed to the one you’re working on.)

The key thing you’ll note is in that last line - we’re referring IIS Express to the obj folder for each web project where the packaging target stages files.

The last thing you need to do is choose one of the project references as the site you want to start up when debugging. That’s a limitation of this solution - you only get to choose one site to start. You’ll have to start and/or attach to the others manually. (On the other hand, if your solution only has one web site then it’s no big deal.)

Scroll up to the top of the debug placeholder .csproj file and add the following three properties to the very top PropertyGroup (the one without a Condition on it):

<StartAction>Program</StartAction>
<StartProgram>$(MSBuildProgramFiles32)\IIS Express\iisexpress.exe</StartProgram>
<StartArguments>/site:MyWebApplication</StartArguments>

This makes it so you’re checking in the information about what to start up when you debug rather than storing it in an external .csproj.user file. You want to do this so it’s easy for everyone using the source to debug. Note that last property, StartArguments, contains the name of one of your project references. See how the Name property on the project reference matches the name of the site starting up?

Now just set the debug placeholder as your startup project and fire it up. The solution will build, your web application will run through a package process, and IIS Express will start up pointed to the deployed version of the app. Visual Studio will attach to it, and then it’s up to you to start up your browser and do your testing.

Below is an example DebugPlaceholder.csproj with the edits highlighted so you can see what a finished project looks like. Standard disclaimer applies: No warranty, no support, you’re on your own. Works on My Machine! Have fun!

<?xml version="1.0" encoding="utf-8"?>
<Project ToolsVersion="4.0" DefaultTargets="Build" xmlns="http://schemas.microsoft.com/developer/msbuild/2003">
  <PropertyGroup>
    <Configuration Condition=" '$(Configuration)' == '' ">Debug</Configuration>
    <Platform Condition=" '$(Platform)' == '' ">AnyCPU</Platform>
    <ProductVersion>8.0.30703</ProductVersion>
    <SchemaVersion>2.0</SchemaVersion>
    <ProjectGuid>{594FFDF6-6911-47DA-AE93-29CBCE757C19}</ProjectGuid>
    <OutputType>Library</OutputType>
    <AppDesignerFolder>Properties</AppDesignerFolder>
    <RootNamespace>DebugPlaceholder</RootNamespace>
    <AssemblyName>DebugPlaceholder</AssemblyName>
    <TargetFrameworkVersion>v4.0</TargetFrameworkVersion>
    <FileAlignment>512</FileAlignment>
    <StartAction>Program</StartAction>
    <StartProgram>$(MSBuildProgramFiles32)\IIS Express\iisexpress.exe</StartProgram>
    <StartArguments>/site:MyWebApplication</StartArguments>
  </PropertyGroup>
  <PropertyGroup Condition=" '$(Configuration)|$(Platform)' == 'Debug|AnyCPU' ">
    <DebugSymbols>true</DebugSymbols>
    <DebugType>full</DebugType>
    <Optimize>false</Optimize>
    <OutputPath>bin\Debug\</OutputPath>
    <DefineConstants>DEBUG;TRACE</DefineConstants>
    <ErrorReport>prompt</ErrorReport>
    <WarningLevel>4</WarningLevel>
  </PropertyGroup>
  <PropertyGroup Condition=" '$(Configuration)|$(Platform)' == 'Release|AnyCPU' ">
    <DebugType>pdbonly</DebugType>
    <Optimize>true</Optimize>
    <OutputPath>bin\Release\</OutputPath>
    <DefineConstants>TRACE</DefineConstants>
    <ErrorReport>prompt</ErrorReport>
    <WarningLevel>4</WarningLevel>
  </PropertyGroup>
  <ItemGroup>
    <Reference Include="System" />
    <Reference Include="System.Core" />
    <Reference Include="System.Xml.Linq" />
    <Reference Include="System.Data.DataSetExtensions" />
    <Reference Include="Microsoft.CSharp" />
    <Reference Include="System.Data" />
    <Reference Include="System.Xml" />
  </ItemGroup>
  <ItemGroup>
    <Compile Include="Properties\AssemblyInfo.cs" />
  </ItemGroup>
  <ItemGroup>
    <ProjectReference Include="..\MyWebApplication\MyWebApplication.csproj">
      <Project>{8F2D1C2C-E12D-4880-B731-66F5051A6EF1}</Project>
      <Name>MyWebApplication</Name>
      <IISExpressUrl>http://localhost:22446</IISExpressUrl>
      <IISExpressBindings>http/*:22446:localhost</IISExpressBindings>
    </ProjectReference>
  </ItemGroup>
  <Import Project="$(MSBuildToolsPath)\Microsoft.CSharp.targets" />
  <!-- To modify your build process, add your task inside one of the targets below and uncomment it.
       Other similar extension points exist, see Microsoft.Common.targets.
  <Target Name="BeforeBuild">
  </Target>  -->
  <Target Name="AfterBuild">
    <MSBuild Projects="%(ProjectReference.FullPath)" Targets="Package" Properties="Configuration=$(Configuration);Platform=$(Platform)" />
    <Exec Command="&quot;$(MSBuildProgramFiles32)\IIS Express\appcmd.exe&quot; delete site %(ProjectReference.IISExpressUrl)" ContinueOnError="true" />
    <Exec Command="&quot;$(MSBuildProgramFiles32)\IIS Express\appcmd.exe&quot; add site /name:&quot;%(ProjectReference.Name)&quot; /bindings:%(ProjectReference.IISExpressBindings) /physicalPath:&quot;%(ProjectReference.RootDir)%(ProjectReference.Directory)obj\$(Configuration)\Package\PackageTmp&quot;" />
  </Target>
</Project>

I hate organizing events. I think if I was in a job interview where they ask you that question, “What’s your biggest weakness?” my new answer would be “Organizing a successful event.”

It’s not any one event that led me to this; it’s more the ongoing experience of attempting to organize events that’s brought it on. A long history of non-success. This includes, but is not limited to:

  • Housewarming parties.
  • General gatherings of friends.
  • Birthday parties.
  • Fireworks crews.
  • Online gaming.
  • Vacations.

From this point on, you’re free to abandon ship because I know most of this will probably end up coming across as “poor me” and fairly rant-ish. It just is what it is, though, and if folks are wondering why I’m pretty much giving up on organizing or coordinating… well, anything… then feel free to continue.

I think my primary issue is that people generally have an inability to commit. Regardless of how early you give notice, and regardless of how important it is that you get some level of firm commitment on attendance (or not, as the case may be), people have a reluctance to commit and somehow “lock their schedule down” until the very last moment. Jenn and I found this with our wedding and it’s pretty much the exact reason I didn’t do a fireworks show this year. Some events actually do need a level of commitment and are not on par with “let’s get whoever feels like it together for some beers next Saturday” where it really doesn’t matter if you commit (or show up).

I’m not sure how this came about. I’ve always been the kind of person who will actually be where they say they will be. I find that to be less and less a common quality with folks, which is unfortunate. (I find punctuality is a generally waning quality in people, too, which is equally unfortunate.)

I also find there are some folks who always have perfectly legitimate reasons for not making it time after time. For example, there are some folks who always say they’ll be part of the fireworks crew on the 4th, but then come back with something entirely legitimate which removes their ability to make it. A relative is sick; there was a production problem at work; we forgot and planned our vacation then; there are some relatives in town and we can’t reschedule; and so forth. It’s cool that people have other stuff to do, and every single one of those reasons is 110% legitimate… but, truly, what are the odds, right? Literally every single time there’s something that comes up? (What, you didn’t know the fourth of July was going to be on the fourth of July again this year?) At the very least, it makes me wonder.

There are the folks who can’t do anything without a specific precise itinerary spelled out - when are we meeting, where exactly (including inside/outside the building), how long are we going to be there, what happens after that, how much will it cost, etc. That’s pretty painful when you’re just trying to get a couple of folks together for drinks. It’s not really something you plan out at that level.

Finally, there are the folks who don’t really want a plan (“We’ll figure it out on the fly!”) but then when you agree to just the simplest plan (“Meet at the restaurant tonight at 7:00p”) turn into the people who need the precise itinerary (“Are we meeting in the bar or the seated part of the restaurant? Are we just having drinks or a full meal? Did you want to see a movie after that? Which movie and what time?”). And here I thought there wasn’t going to be a detailed plan.

And, as any parent will tell you, that all becomes doubly complex when you have kids because now you have to also coordinate what the kid is doing (and possibly a babysitter) around the event, which means if someone says “Meet at 7:00p at the restaurant” and you get everything arranged around that time, it’s pretty painful to have them call up and say, “Oh, yeah, I can’t make it at 7:00p, let’s switch it to 8:00p.” Sorry, buddy, I don’t mean to chisel your schedule into a stone tablet, but it’s not really something I can just “switch up” because it’s not just us anymore.

Anyway, like I said, it all sounds like a big “poor me” rant, but that’s why I’m not coordinating stuff anymore, or, at least, I’ll avoid it wherever possible.

media, home comments edit

We recently switched from Frontier back to Comcast because we were having issues with Frontier’s customer service and pricing. Plus, Frontier is really trying to get out of the TV game and we like our TV features, so Comcast got us back. (I was also pretty tired of Frontier remotely reprogramming my router and then denying it.)

Anyway, Comcast gives you a cable modem but no router, so I ended up getting a Netgear WNDR3700v2 for a replacement. That freed up my D-Link DAP-1522 to move upstairs and become a wireless bridge.

After moving everything around, my network looks like this:

Home network diagram after adding the new router and
bridge.

So far it’s working very well, with the exception of a couple of recent dropouts in the 2.4GHz wireless on the router. I’ve updated the firmware on it to the latest, which is supposed to take care of that, and… so far, so good.

media, windows comments edit

For a while I’ve been using MozyHome in a sort of weird, confusing fashion to back up the share content from my Windows Home Server. There were two problems with this setup:

  1. Lots of moving pieces. The way I had it, there was a scheduled copy task from the WHS to a remote machine, then that remote machine would do the MozyHome backup. That, of course, relied on the remote machine to always be on and running, the process to properly run, etc. A lot of indirection and moving pieces to get around the MozyHome shortcoming that it won’t install on Windows Home Server.
  2. MozyHome’s pricing is changing. They’re moving away from the $55/year unlimited storage plans and going to a tiered storage plan. Probably not so bad for most folks, but for the 250GB of data I have, it’d cost me around $350/year - seven times what I’m already paying. For that I can definitely find a different solution, even if it’s buying a bunch of 1TB USB drives.

For a while I started looking into the built-in WHS backup thing where you can attach a USB drive and use the WHS console to back up your shares… but it’s a totally manual process. Why they wouldn’t make that something I could run on a scheduled basis is beyond me. But, that being the case, I took it out of the running. It’s gotta be automated.

Luckily, I found a solution:CrashPlan.

I’m not sure why these guys didn’t come up in my initial research, but they seriously solved all my problems.

  • $50/year for unlimited storage. And if you get multiple years’ worth of storage, you can get it down to $35/year. For unlimited storage. That addresses the pricing problem.
  • Installs directly on Windows Home Server. Technically it’s not “officially supported” but it works like a charm. They even have a wiki page explaining how to install it.
  • Allows you to automate backup to the cloud and to a local drive. With the multiple-backup-destination feature CrashPlan offers, you can automatically back up your data to the cloud (“CrashPlan Central,”), to another machine on your network, to a local drive/folder, or even to a friend’s machine. The local drive/folder support addresses my too-many-moving-pieces issue: back up to a USB drive right on your home server.

So, goodbye, Mozy - hello, CrashPlan.

Follow the wiki instructions and get CrashPlan installed. That wiki page also tells you how to configure the WHS shares to be backed up.

Once you have the shares configured, you’ll see them in the CrashPlan app on the “Backup” tab listed in the “Files” section.
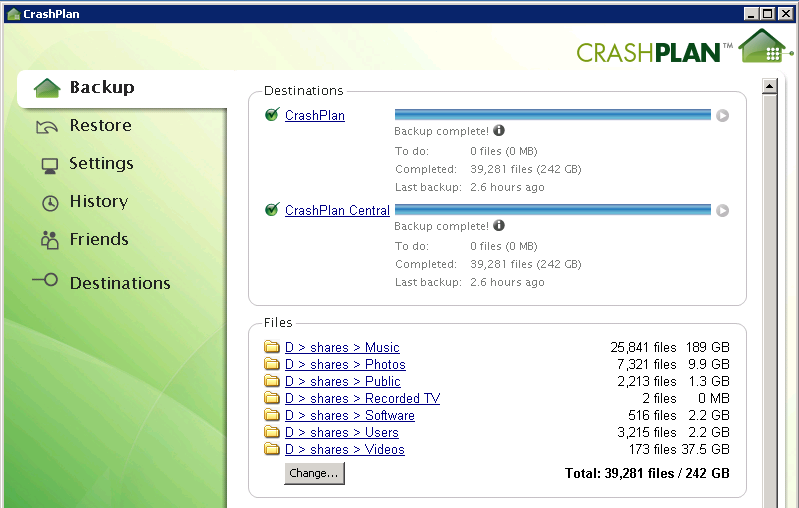
CrashPlan Backup tab showing files to back
up.

Next, attach your USB drive to the WHS. Make sure you don’t add it to the storage pool or set it up as a server backup. You want it unincorporated so CrashPlan can use it.

Your drive is attached, so in CrashPlan, jump down to the “Destinations” tab and select “Folders.” In here, click the “Select…” button and select the location you want your backups sent to. I made a folder at “E:\CrashPlan” for my backups. Once it’s selected, the name of the folder shows up in the destination list - that’s why you see “CrashPlan” there in my list. Don’t start the backup yet, you’re not done.

Something to note about the folder you select there: The stuff that gets dumped in there won’t be human-readable. It’s all random numbered files and indexes and things. CrashPlan encrypts the stuff that gets dumped in there (just as it will encrypt it if you back up to a friend’s house, so your friend can’t get your stuff). It just means you can’t take the drive and plug it in elsewhere and copy/paste stuff off of it. You will have to restore through the CrashPlan app.
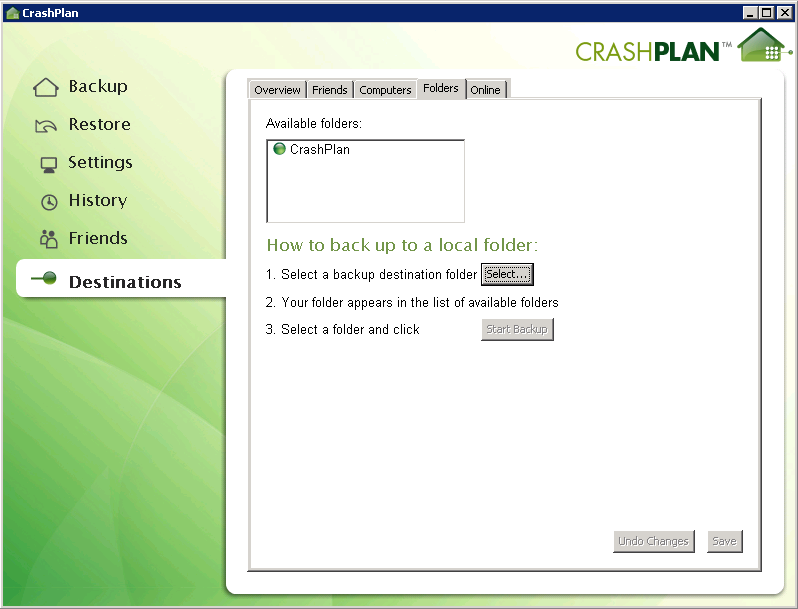
CrashPlan Destinations showing my local folder as a
destination.

Now, still under “Destinations,” click “Online.” Make sure you’ve got “CrashPlan Central” listed and going. It should already be there, but it’s good to check.

Hop up to the Settings tab and configure your alerts. CrashPlan can notify you on a periodic basis of your backup status and data usage. It can also notify you if there’s any problem. Very slick, and something MozyHome never did. The buttons for that are at the bottom under “Backup Status and Alerts” on the “General” tab.
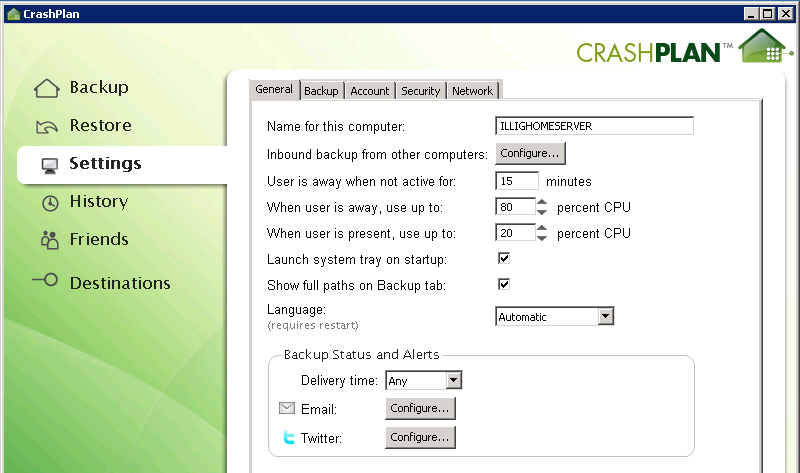
My alert
settings.

Finally, still in Settings, select the “Backup” tab and configure how many revisions of each file to keep in your backup archive. Do this by clicking the “Configure…” button next to “Frequency and Versions.” This was the most confusing part for me since there really isn’t any documentation.

You sort of have to read it like sentences:

  • Backup a new version every six hours. (Basically, this selects how often to run the backup process.)
  • For backups in the last week, keep all the versions found every six hours.
  • For backups beyond the last week but within the last 90 days, keep a daily version.
  • For backups beyond the last 90 days but within the last year, keep a weekly version.
  • Beyond the last year, keep a monthly version.
  • If I delete a file, remove the deleted file from my backup archive after six months.

Since the files on my home server don’t change much, this is reasonable. I have a feeling I may have too many versions of things being retained, but I can always change the policy later.

Now you can run the backup. Go back to the main “Backup” tab and you’ll see a little arrow next to each of the backup sources. It looks like a “Play” button in a media player program. Click that on each source and the backup will start. Only one backup will run at a time, so if you click the button on both CrashPlan Central and your local folder, the last one clicked will run first; after it completes, the other source will run. It doesn’t really matter what order they run in that first time since they both have to complete anyway. After that it’ll all be automatic. (You can see these little arrows in my first screenshot at the top, grayed out since my backup is complete.)

If you ever need to restore a file, you can do that through the “Restore” tab in the CrashPlan app:
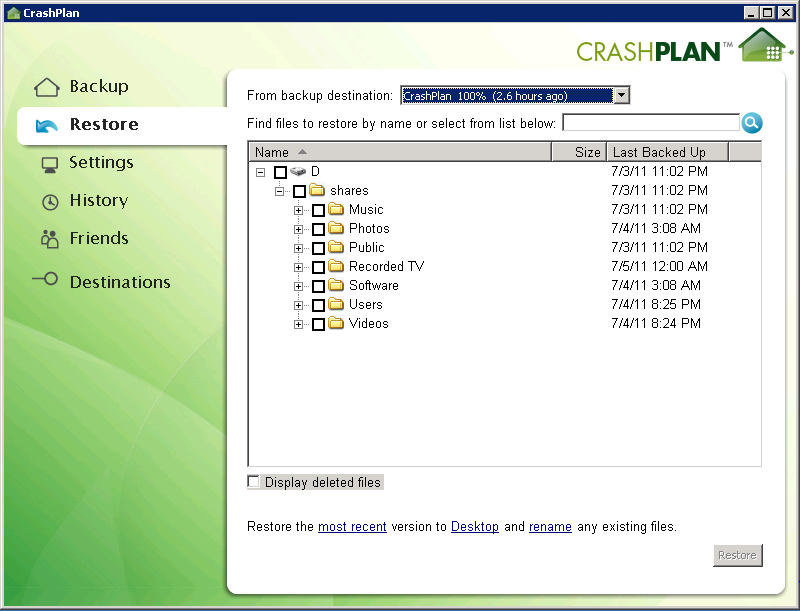
CrashPlan restore
tab.

The links at the bottom there allow you to change which version of the files you want to restore, where they get restored to, and what happens when there’s a naming collision.

The only real downside I’ve seen so far is the lack of shell integration. I can’t just right-click and look at previous versions of a file or something like that. On the other hand, for my home server, that’s not as big of a deal.

Last thing to mention: If you start running out of disk space, you need to compact the backup database. On the Destinations tab, under “Folders,” select the folder you’re backing up to and you can see the amount of space currently taken. Use the “Compact” button to compact the database.

There’s a similar button for the online source at CrashPlan Central. You can read more about compacting the database and what that means on the CrashPlan wiki. Anyway, I’m not quite there yet so I can’t really vouch for this part of things.

If you’re looking for a nice way to back up your Windows Home Server, I’d recommend CrashPlan. Easy to set up, easy to use, and totally automatic. I wish I’d found this a long time ago.