gists, windows comments edit

I develop on a daily basis on a Windows Server 2008 R2 machine. I do that because that’s my target deployment environment and it’s really helpful to be able to actually run the full product and debug right there on my “workstation.” As such, I have the full “desktop experience” enabled - Aero, themes, the whole bit.

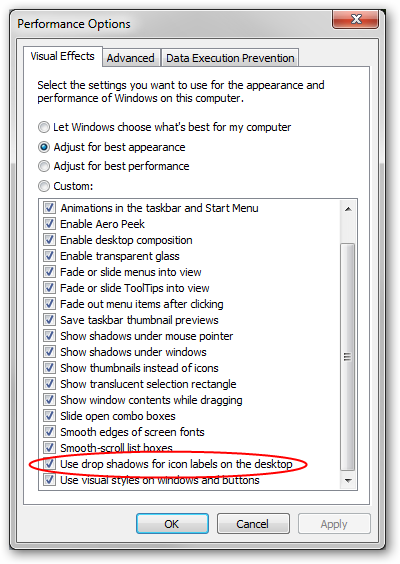
One problem I noticed was that the drop shadows under the icons on the desktop… they just don’t stick around. I set my visual effects settings to “best appearance” and everything looks correct, but if I log out and back in, the setting remains checked but there’s no drop shadow. That doesn’t sound like a big deal except… well, I have a theme on the desktop that changes background images periodically and the icons get impossible to read without that shadow.

Visual Effects in Windows Server 2008

The only way I’ve found to get the drop shadows back is to go all the way into the control panel, select “Adjust for best performance,”click “Apply,” and then select “Adjust for best appearance” and click “Apply” again. Basically, reapply the settings.

I’ve tried just modifying the registry values corresponding to these settings, but those values don’t get applied when they change. You actually have to inform the desktop engine somehow to “refresh.” I couldn’t figure out how to do that… so I went about it a different way.

UsingAutoIt v3, I wrote a little script that automates this for you: it actually opens up the dialog and does the whole re-application of the settings. In the event you’re in the same boat as me (both of you still reading), here’s the script:

#RequireAdmin
ShellExecute("sysdm.cpl")
WinWaitActive("System Properties")
ControlCommand("System Properties", "", 12320, "TabRight", "")
Send("!s")
WinWaitActive("Performance Options")
Send("!p!a")
WinWaitActive("Performance Options")
Send("!b{ENTER}")
WinActivate("System Properties")
ControlClick("System Properties", "", 1)

Running that will prompt you for admin credentials if you’re not already an admin (because changing system settings requires admin privileges) and clicks all the right buttons to switch you to “best performance” and back to “best appearance.”

vs, downloads, coderush comments edit

Visual Studio allows you to specify different code formatting rules for different languages it understands, but in many cases the formatting only applies to new code you’re writing. For example, C# lines generally get formatted when you hit the end of the line and type the semicolon… but the only line that gets formatted is the one you just completed.

Wouldn’t it be nice if the whole document would adhere to the same formatting without you having to pay attention to it?

With this plugin, you can automatically have Visual Studio apply code formatting to the entire document you’re working on when you save. That way you don’t have to think about it - your documents will always be formatted.

(You used to be able to do this in VS2008 using PowerCommands, but that doesn’t exist for VS2010 and this way you don’t need to install PowerCommands just for the one functionality.)

You also have the ability to choose which types of documents you want formatted on save:

Options dialog

It’s free, right now, on the DXCore Community Plugins site. Go get it!

media comments edit

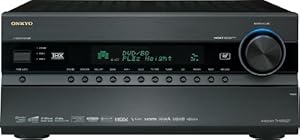
This weekend I took Saturday from about 11:00a to 7:00p installing and configuring my new Onkyo TX-NR3007 receiver.

Onkyo
TX-NR3007

This replaces a Yamaha receiver I had from probably 10 years ago from The Good Guys (a now-defunct consumer electronics store that used to be everywhere locally). The primary driver for the upgrade is that I have a Bose Acoustimass 16 speaker kit that will support 6.1 surround, but the Yamaha receiver only has 5.1 outputs… so there’s a speaker that’s been sitting idle in a cabinet for a few years, yearning to break free. This Onkyo supports 9.2 surround, so plenty of room to upgrade.

I compared several options before settling on this particular receiver. My initial criteria:

  • Between $750 and $2000.
  • At least four HDMI inputs.
  • At least 6.1 surround support.

I started looking at models from Denon, Onkyo, Yamaha, and Pioneer, but quickly came down to Denon vs. Onkyo. From there, I compared:

  • Denon AVR-2310CI
  • Denon AVR-3310CI
  • Denon AVR-4310CI
  • Denon AVR-4810CI
  • Onkyo TX-NR807
  • Onkyo TX-NR1007
  • Onkyo TX-NR3007
  • Onkyo TX-NR5007

All of those have at least 5 HDMI inputs and 7.1 surround, and all are in the price range.

I ruled out the AVR-2310CI based on the fact it was the only one that didn’t have network connectivity and all the others did - I have a lot of music on my Windows Home Server and I want to have access to it if possible. I ruled out the TX-NR807 based on the very few component inputs, lack of discrete channel inputs, and no USB port. So the lower-end items in the list got ruled out.

I then started looking at the expandability of the speakers and ruled out the AVR-3310CI and AVR-4310CI. Both of those are 7.1 outputs while the remaining Onkyo units have 9.2 surround and the AVR-4810CI has 9.3.

After that, it was a bang-for-the-buck comparison. The remaining contenders price out like this (roughly):

  • Denon AVR-4810CI: $3000
  • Onkyo TX-NR1007: $1200
  • Onkyo TX-NR3007: $1500
  • Onkyo TX-NR5007: $1900

Again, that’s rough pricing - you can find sales and such that’ll save you a couple hundred, give or take, but that’s around the average price I saw.

The Denon, then, was well beyond the pricing of the Onkyos. Like, double. I can’t justify that much price difference, especially given my original budget constraints, even if the brand is potentially more reliable.

Of the remaining Onkyos, I went middle-of-the-road. The TX-NR3007 has a USB flash drive port, which the 1007 does not, and has one more HDMI input than the 1007, for a total of seven HDMI inputs. The TX-NR3007 has one fewer HDMI input and one fewer optical audio input than the 5007, and the 3007 has a 24-bit DAC while the 5007 has a 32-bit DAC… but I couldn’t justify the additional price for those features.

So: the Onkyo TX-NR3007. I got a screamin’ deal on it through some friends (big thanks to them) which got me the receiver and the three-year warranty for $1400. (Yes, I got the warranty. I’ve had the warranty save me on electronics purchases twice now, so pretty much anything over $750 I’ll consider getting it. Did you know that geomagnetic forces affect large-tube TVs?)

Anyway, thanks to Alex Scoble for helping me figure some of the receiver stuff out. That guy is an A/V king.

The Wiring Rat's
NestSince I was able to use HDMI to connect audio and video at the same time (my old Yamaha receiver only had audio inputs), I had to tear out pretty much all the wiring I had so I could rewire using HDMI. That’s actually what took me all day - the rewiring effort. I’m pretty anal about my cable management, so when all is said and done, it’s nicely bundled using velcro ties and cable wraps. But that also means it’s a pain in the ass to take apart if you’re redoing the whole system, so… much un-velcro-ing ensued. This picture to the right is of some of the wiring as I was in the process of ripping things out. Painful.

I also found that the receiver is 18.25” deep and my entertainment center is 18.5” deep, so there wasn’t enough room to plug anything into the back of it. That meant “cut a flap in the back of the entertainment center so you can plug stuff in.” That wasn’t too bad, but I wanted to do a nice job so it was time consuming and involved a couple of X-Acto knife blades. (The back of the entertainment center is a thick paperboard, not wood.)

After slotting that 65-pound beast into place, it was a matter of connecting everything up. There are a lot of inputs on the back, so this was mostly just trying to figure out which one(s) to use. Luckily, it turns out they’re all totally assignable, so you can say “The ‘CABLE/SATELLITE’ input really corresponds to HDMI input 3.”

So many connections, so little
time...

And the final step, before strapping all the wires back down, was to test out the various components and make sure everything was connected correctly. I had a minor issue in that the HDMI inputs are numbered right-to-left instead of left-to-right, so what I thought I had plugged into HDMI input 1 was actually in HDMI input 7 (and so forth), but that was easy enough to straighten out. Chalk it up to me not paying close enough attention.

I got all the cables strapped down, pushed it all into place, ran the Audyssey MultEQ auto configuration utility, and watched me a little TV!

The Onkyo TX-NR3007 in the entertainment
center.

We also tried out some of the cool internet features, like listening to vTuner radio (free through this receiver) from around the world and logging into Pandora and listening/rating tracks right through the receiver. My sister and brother-in-law are living in Malta right now so we listened to some Maltese radio just to hear what they’re listening to. Very neat! It also detected my Asset UPnP installation on my Windows Home Server and I was able to browse and play my music library right through the receiver. (I did have to switch Asset to stream using WAV rather than LPCM, but WAV seems to work for both PS3 and the receiver.)

In playing some games and watching some movies, I found that my previous configuration had the rear surround turned down way too low and things were just not balanced as well as I thought. The surround after the Audyssey MultEQ configuration is much richer and more defined. I did notice that I had to mess with some of the “listening modes” to find the best one for standard stereo TV content and stereo streaming Netflix over Xbox 360, but the “THX Games” mode for Xbox 360/Dolby Digital games is really sweet and had Left4Dead 2 sounding phenomenal.

I was surprised at how cool the receiver runs. I figured this behemoth would run hot, but it’s actually not too bad. Warm, but not hot. I’m sure the big ol’ flap I cut for the cables in the back of the cabinet helps to keep the air circulating. Might have to consider doing that for the PS3, which sounds like a damn jet engine all the time it runs so hot.

Another surprising and cool detail was that my media center PC (running Windows 7) detected the new “display” as “TXNR3007” - it knew the kind of “monitor” it was hooked to. It also knew that the display “supported” several different HD-compatible resolutions, while connecting to the TV all it registered support for was 1920x1080. This allowed me to turn down the resolution a tad (I don’t watch full HD video through the media center) and hopefully save some video processing cycles.

Only negatives I’ve found to the new receiver:

The remote control situation. The remote it comes with doesn’t have enough buttons to replace my current universal and support all of the things my TV, cable box, etc. does… but the receiver remote also has two separate power buttons - one for “on” and one for “standby” - and my current universal remote only has one power button that can either turn the receiver on or off, but not both. The receiver remote also has a ton of stuff that I won’t be messing with once I’ve got everything set up to my liking, and Jenn’s got the current universal mastered… so I may just have to use the “learning” capacity on the current universal and teach some button to be the “off” for the receiver. Kind of kludgy, but them’s the breaks.

The “click.”It has this “click” noise that it makes as it switches from stereo to surround inputs. For example, if you’re watching HDTV and you’re crusing along great in Dolby Digital, then the local affiliate jams in a standard-def stereo signal, the receiver goes “click” as it switches from processing surround to stereo… then “click” again as it switches back. Not a deal breaker, but I kind of wish it didn’t do that.

Video processing warmup time. Turn on the TV, turn on the receiver, switch to the Xbox input, and turn on the Xbox. You hear the sound of the Xbox starting up, but the video signal takes three-to-five seconds to show up as all the internal signal switching goes on and everything filters through to the TV. Again, not a huge deal, but it was kind of scary the first couple of times as I was caught thinking, “Whooooooa… where the hell is my video?” That said, my TV (Samsung LN52A750) is not entirely blame-free - when a single input switches resolutions, it takes a couple of seconds to reacquire the signal for display. Found that out while messing with my media center PC resolutions.

None of those negatives is a huge issue, but something to be aware of. I don’t think I’d make a different purchasing decision based on them. I like the flexibility, the power, and the price of the unit, so no regrets. As things unfold, like if I find new or interesting things with it, I’ll keep the blog posted.

(I’m actually thinking of starting a wiki site dedicated to my home theater/media center setup - not really “community contribution” like a usual wiki so much as my notes on things I discover, how I set things up, etc., so interested folks can learn from my mistakes. Does that sound interesting to people?)

UPDATE 4/27/2010: I’ve posted about what I’ve learned two weeks in with this receiver.

dotnet, vs comments edit

In VS2010 Microsoft really hasn’t accounted for integrating FxCop into your continuous integration/scripted build in any way other than building through Visual Studio (unless you’re running Team Foundation Server, which I’m not). If you want your CI server to run FxCop, you have to have VS installed, which is pretty lame.

In addition, the format of the project files changed slightly, the list of assemblies containing rules has changed, and the way you specify which rules to run and which not to run is different (there’s a new concept of a “ruleset”).

And, of course, none of this is documented.

So here’s what I want:

  • I want to run FxCop in continuous integration.
  • I don’t want to have to install Visual Studio on the build server.
  • I want to be able to run analysis as a big batch job at the end rather than one project/solution at a time during the build process. (That way I can also potentially run it asynchronously with other analysis.)

It took a bit, but I think I’ve figured it out.

Get a copy of FxCop from an installed Visual Studio. You’ll find it under your VS2010 install folder in a place like this: C:\Program Files\Microsoft Visual Studio 10.0\Team Tools\Static Analysis Tools\FxCop

Take that whole folder and put it on your build server somewhere, or check it in alongside your source code as a dependency/tool. (I don’t know if that somehow violates licensing or not, but you won’t be distributing it, you just want to run it. YMMV. I’m no lawyer.)

Create a RuleSet. This is the new way of saying which rules to run. It used to be part of the FxCop project file, but they changed it up a bit. To get a RuleSet:

  1. Create a new throwaway project in Visual Studio.
  2. Right-click on the project and select “Properties.”
  3. On the left side of the properties window, select “Code Analysis.”
  4. You should see a “Rule Set” area with a dropdown box marked “Run this rule set.” Select one of the pre-defined rule sets to start with and click “Open.”
  5. Make changes to the rule set. Deselect rules you want run, etc.
  6. Select File -> Save As… and save the modified rule set somewhere you can get it later.

Put the RuleSet along with your build scripts. The build script (when you run FxCop) will need to find that RuleSet, so put it along with your other build scripts and artifacts.

Add the location of the FxCop rules to the RuleSet. Open the RuleSet file in a text editor. Under the “RuleSet” root element, add a new “RuleHintPaths” element. Inside “RuleHintPaths,” add a “Path” element with text that has the path to the FxCop “Rules” folder - it needs to be able to find all of the rules assemblies that will be running. If you have custom rules, you’ll need to add more “Path” elements.

Your RuleSet will look something like this:

<?xml version="1.0" encoding="utf-8"?>
<RuleSet Name="My Rules"
         Description="Rules that should be run on my assemblies."
         ToolsVersion="10.0">
  <RuleHintPaths>
    <Path>..\toolset\thirdparty\fxcop-vsts\Rules\</Path>
  </RuleHintPaths>
  <IncludeAll Action="Error" />
  <Rules AnalyzerId="Microsoft.Analyzers.ManagedCodeAnalysis" RuleNamespace="Microsoft.Rules.Managed">
    <Rule Id="CA1006" Action="None" />
    <Rule Id="CA1014" Action="None" />
    <Rule Id="CA1016" Action="None" />
    <Rule Id="CA1020" Action="None" />
    <Rule Id="CA1054" Action="None" />
    <Rule Id="CA1055" Action="None" />
    <Rule Id="CA1056" Action="None" />
    <Rule Id="CA1303" Action="None" />
    <Rule Id="CA2210" Action="None" />
    <Rule Id="CA2243" Action="None" />
  </Rules>
</RuleSet>

Update your FxCop project file. If you were using an FxCop project file before, for example, if you were generating a dynamic dependency list, you have to do some updates. I’ll enumerate them first, then I’ll show you my FxCop project file.

  • Change your PlatformAssembliesLocation to point to the .NET 4.0 install location.
  • Remove the TargetFrameworkVersion node. (There’s no explicit .NET 4 target it seems, so omitting it will automatically target .NET 4.)
  • Update the Rules/RuleFiles element to contain a list of all of the assemblies with rules in them, and make sure AllRulesEnabled on each is set to “True.” You’ll disable rules using your RuleSet.

Here’s what my FxCop project file looks like. I am dynamically generating the list of dependency locations as well as the list of assemblies to analyze, which is why you see some weird looking <!-- @DIRECTORIES@ --> comments in there. Check out my blog entry for more on that. In your project, you’ll probably have a real list of directories/assemblies to analyze there.

<?xml version="1.0" encoding="utf-8"?>
<FxCopProject Version="10.0" Name="FxCop Project">
 <ProjectOptions>
  <Stylesheet Apply="False">FxCopReport.xsl</Stylesheet>
  <PlatformAssembliesLocation>c:\WINDOWS\Microsoft.NET\Framework\v4.0.30128</PlatformAssembliesLocation>
  <SharedProject>True</SharedProject>
  <SaveMessages>
   <Project Status="Active, Excluded" NewOnly="False" />
   <Report Status="Active" NewOnly="False" />
  </SaveMessages>
  <ProjectFile Compress="True" DefaultTargetCheck="True" DefaultRuleCheck="True" SaveByRuleGroup="" Deterministic="True" />
  <EnableMultithreadedAnalysis>True</EnableMultithreadedAnalysis>
  <EnableMultithreadedLoad>True</EnableMultithreadedLoad>
  <SourceLookup>True</SourceLookup>
  <AnalysisExceptionsThreshold>10</AnalysisExceptionsThreshold>
  <RuleExceptionsThreshold>1</RuleExceptionsThreshold>
  <Spelling Locale="en-US" />
  <OverrideRuleVisibilities>False</OverrideRuleVisibilities>
  <SearchGlobalAssemblyCache>True</SearchGlobalAssemblyCache>
  <DeadlockDetectionTimeout>120</DeadlockDetectionTimeout>
  <IgnoreGeneratedCode>True</IgnoreGeneratedCode>
 </ProjectOptions>
 <Targets>
  <!-- @TARGETS@ -->
  <AssemblyReferenceDirectories>
   <!-- @DIRECTORIES@ -->
  </AssemblyReferenceDirectories>
 </Targets>
 <Rules>
  <RuleFiles>
   <RuleFile Name="$(FxCopDir)\Rules\DataflowRules.dll" Enabled="True" AllRulesEnabled="True" />
   <RuleFile Name="$(FxCopDir)\Rules\DesignRules.dll" Enabled="True" AllRulesEnabled="True" />
   <RuleFile Name="$(FxCopDir)\Rules\GlobalizationRules.dll" Enabled="True" AllRulesEnabled="True" />
   <RuleFile Name="$(FxCopDir)\Rules\InteroperabilityRules.dll" Enabled="True" AllRulesEnabled="True" />
   <RuleFile Name="$(FxCopDir)\Rules\MaintainabilityRules.dll" Enabled="True" AllRulesEnabled="True" />
   <RuleFile Name="$(FxCopDir)\Rules\MobilityRules.dll" Enabled="True" AllRulesEnabled="True" />
   <RuleFile Name="$(FxCopDir)\Rules\NamingRules.dll" Enabled="True" AllRulesEnabled="True" />
   <RuleFile Name="$(FxCopDir)\Rules\PerformanceRules.dll" Enabled="True" AllRulesEnabled="True" />
   <RuleFile Name="$(FxCopDir)\Rules\PortabilityRules.dll" Enabled="True" AllRulesEnabled="True" />
   <RuleFile Name="$(FxCopDir)\Rules\ReliabilityRules.dll" Enabled="True" AllRulesEnabled="True" />
   <RuleFile Name="$(FxCopDir)\Rules\SecurityRules.dll" Enabled="True" AllRulesEnabled="True" />
   <RuleFile Name="$(FxCopDir)\Rules\SecurityTransparencyRules.dll" Enabled="True" AllRulesEnabled="True" />
   <RuleFile Name="$(FxCopDir)\Rules\UsageRules.dll" Enabled="True" AllRulesEnabled="True" />
  </RuleFiles>
  <Groups />
  <Settings />
 </Rules>
</FxCopProject>

Update your FxCop command line. The last thing you have to do is modify the <Exec> task you have in your MSBuild script so it points to your project and your RuleSet. Just add the /ruleset parameter to point to run your rules, like /ruleset:=YourRuleset.ruleset

My FxCop command line looks something like this (anonymized/simplified for illustration purposes):

<PropertyGroup>
  <FxCopProject>Path\To\Project.FxCop</FxCopProject>
  <FxCopOutput>Path\To\Output\FxCopReport.xml</FxCopOutput>
  <FxCopXsl>$(FxCopDir)\Xml\FxCopReport.xsl</FxCopXsl>
  <FxCopDictionary>Path\To\CodeAnalysisDictionary.xml</FxCopDictionary>
  <FxCopRuleset>Path\To\YourCustom.ruleset</FxCopRuleset>
</PropertyGroup>
<Exec ContinueOnError="true" Command="$(FxCopDir)\FxCopCmd.exe /dictionary:&quot;$(FxCopDictionary)&quot; /ruleset:=&quot;$(FxCopRuleset)&quot; /o:&quot;$(FxCopOutput)&quot; /p:&quot;$(FxCopProject)&quot; /fo"/>

Once you have that, you should be able to run FxCop from the command line in your build without having to install Visual Studio.

Now to go through and fix all the new errors it found…

vs, dotnet comments edit

If you’re using third-party plugins with DXCore (CodeRush/Refactor) fromDevExpressand you’re moving to Windows 7 or Windows Server 2008, this will affect you.

I had an issue filed recently on CR_Documentor where a user was correctly deploying the plugin but DXCore wouldn’t load it (and, thus, the user couldn’t see the CR_Documentor tool window link or anything).

Looking in the DevExpress message log, the exception message seen was like this:

Exception occurred while attempting to load assembly at "C:\Users\USERNAME\Documents\DevExpress\IDE Tools\Community\PlugIns\CR_Documentor.dll". (System.IO.FileLoadException)

Following inner exceptions down the stack, we finally saw the true reason the plugin wasn’t loading:

System.NotSupportedException: An attempt was made to load an assembly from a network location which would have caused the assembly to be sandboxed in previous versions of the .NET Framework. This release of the .NET Framework does not enable CAS policy by default, so this load may be dangerous. If this load is not intended to sandbox the assembly, please enable the loadFromRemoteSources switch. See http://go.microsoft.com/fwlink/?LinkId=155569 for more information.

I filed an issue with DevExpress (who, by the way, has a great support team) and we found one solution by modifying the <loadFromRemoteSources> element in devenv.exe.config (as mentioned in the exception message), but changing your config just for one plugin doesn’t make sense, and that’s when the real solution hit me.

You need to unblock DXCore plugins. Windows knows you got them from a remote location (e.g., Google Code) and limits their permissions. Sort of like how you have to unblock .CHM files so you can read them.

These instructions should work in any version of Windows from WinXP SP3 and up.

  1. Close all instances of Visual Studio.
  2. Right-click the plugin assembly and select “Properties.”
  3. On the “General” tab, click the “Unblock” button.
  4. Click “OK” to apply the changes and close the properties window.

Everything should work correctly now.

Click the "Unblock" button to enable the
plugin.